起步
项目基于vue+vuex进行构建
1. 安装
npm install easemob-websdk --savenpm install strophe.js
2. 配置 connection.js
找到
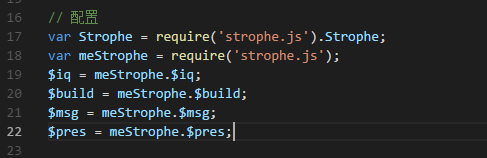
node_modules/easemob-websdk/src/connection.js, 在大概十六行的位置加入以下代码
var Strophe = require('strophe.js').Strophe;
var meStrophe = require('strophe.js');
$iq = meStrophe.$iq;
$build = meStrophe.$build;
$msg = meStrophe.$msg;
$pres = meStrophe.$pres;
然后还是在这个文件,大约在667行加入
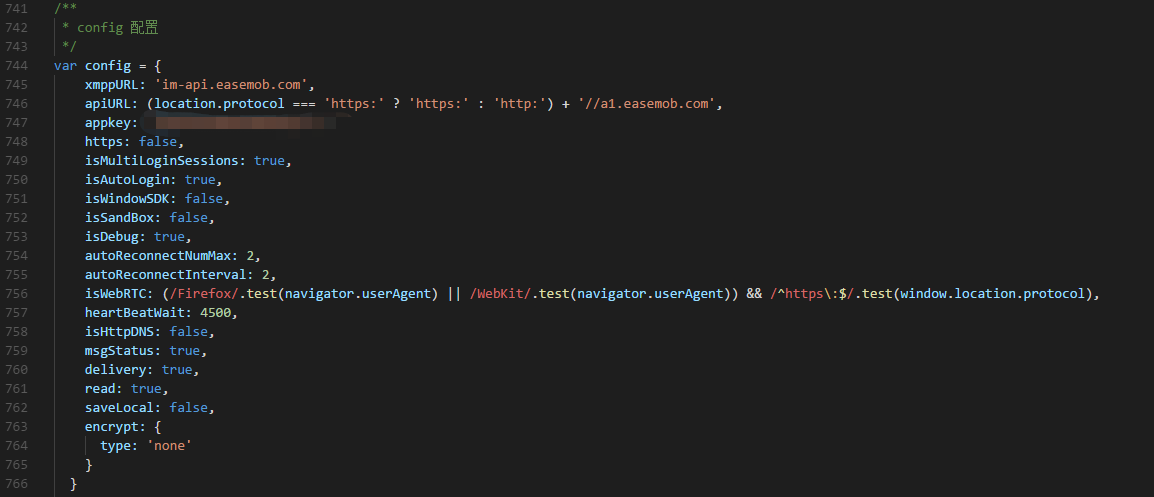
config定义
var config = {
    xmppURL: 'im-api.easemob.com',
    apiURL: (location.protocol === 'https:' ? 'https:' : 'http:') + '//a1.easemob.com',
    appkey: '官网实例appkey',
    https: false,
    isMultiLoginSessions: true,
    isAutoLogin: true,
    isWindowSDK: false,
    isSandBox: false,
    isDebug: true,
    autoReconnectNumMax: 2,
    autoReconnectInterval: 2,
    isWebRTC: (/Firefox/.test(navigator.userAgent) || /WebKit/.test(navigator.userAgent)) && /^https\:$/.test(window.location.protocol),
    heartBeatWait: 4500,
    isHttpDNS: false,
    msgStatus: true,
    delivery: true,
    read: true,
    saveLocal: false,
    encrypt: {
      type: 'none'
    }
  }
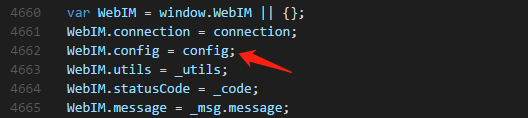
还是当前文件, 大约在 4660 行找到
var WebIM = window.WebIM || {}, 在下面加入上面定义的config配置
WebIM.config = config;
2.1 配置 strophe.js
找到
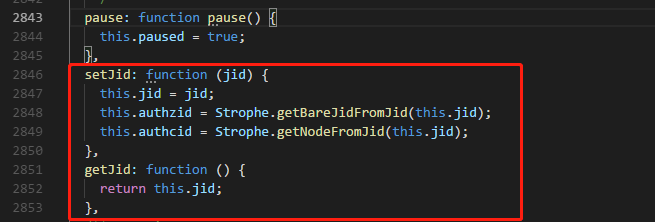
node_modules/strophe.js/dist/strophe.js,大约在 2845行pause: function pause() {this.paused = true;}后面,加入以下代码
setJid: function (jid) {
    this.jid = jid;
    this.authzid = Strophe.getBareJidFromJid(this.jid);
    this.authcid = Strophe.getNodeFromJid(this.jid);
},
getJid: function () {
    return this.jid;
},
完成以上步骤基本可以在组件内使用了。
使用
1. main.js 配置
// 环信IM配置
import websdk from 'easemob-websdk'
let WebIM = window.WebIM = websdk
Vue.prototype.$WebIM = WebIM
var conn = new WebIM.connection({
isMultiLoginSessions: WebIM.config.isMultiLoginSessions,
https: typeof WebIM.config.https === 'boolean' ? WebIM.config.https : location.protocol === 'https:',
url: WebIM.config.xmppURL,
heartBeatWait: WebIM.config.heartBeatWait,
autoReconnectNumMax: WebIM.config.autoReconnectNumMax,
autoReconnectInterval: WebIM.config.autoReconnectInterval,
apiUrl: WebIM.config.apiURL,
isAutoLogin: true
});
const options = {
apiUrl: WebIM.config.apiURL,
user: '****',
pwd: '****',
appKey: WebIM.config.appkey,
success:function (token) {
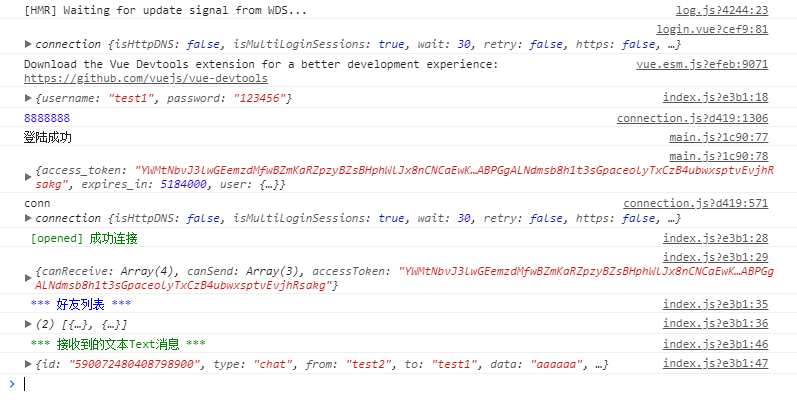
console.log('%c 登陆成功', 'color: green')
console.log(token)
},
error:function (err) {
console.log('%c *** err ***', 'color: red')
console.log(err)
}
}
Vue.prototype.$imConn = conn
Vue.prototype.$imoption = options
2. 组件内使用
methods: {
    login() {
      if (this.username == "") {
        this.alertShow("请输入用户名");
        return;
      } else if (this.password == "") {
        this.alertShow("请输入密码");
        return;
      } else {
        const user = {
          username: this.username,
          password: this.password
        };
        // vuex 响应
        this.$store.dispatch('DO_Login_IM', user)
      }
    }
}
vuex
const actions = {
    DO_Login_IM (commit, obj) {
        console.log(obj)
        var imConn = Vue.prototype.$imConn

        Vue.prototype.$imoption.user = obj.username
        Vue.prototype.$imoption.pwd = obj.password

        imConn.open(Vue.prototype.$imoption)

        imConn.listen({
            onOpened (message) {   // 建立连接
                console.log('%c [opened] 成功连接 ', 'color: green')
                console.log(message)
                // 登陆状态
                imConn.setPresence()
                // 获取好友列表
                imConn.getRoster({
                    success (lists) {
                        console.log('%c *** 好友列表 ***' , 'color: blue')
                        console.log(lists)
                    }
                })
            },
            onClosed (message) {  // 连接关闭
                console.log('%c [close] 连接关闭 ', 'color: red')
                console.log(message)
            },

            onTextMessage (message) {  // 接收文本消息
                console.log('%c *** 接收到的文本Text消息 ***', 'color: green')
                console.log(message)
            },
            onEmojiMessage (message) {  // 接收表情
                console.log('%c [emoji] 表情', 'color: yellow')
                console.log(message)
            },
            onPictureMessage (message) {  // 接收图片
                console.log('%c [image] 接收图片', 'color: #2b99ff')
                console.log(message)
                let options = {url: message.url}
                options.onFileDownloadComplete = function (data) {
                    console.log('%c *** 图片下载成功 ***' ,'color: green')
                    console.log(data)
                }
                options.onFileDownloadError = function (err) {
                    console.log('%c *** 图片下载失败 ***', 'color: red')
                    console.log(err)
                }
                Vue.prototype.$WebIM.utils.download.call(Vue.prototype.$imConn, options)
            },

            onRoster (message) {
                console.log('*** Roster ***')
                console.log(message)
            },
            onError (error) {  // 错误监听
                console.log(error)
            }
        })
    }
}
总结
以上配置基本可以实现一个简单的聊天室配置,如有什么不对的地方请大家指出,多多交流