
目录
- Vue 基础语法
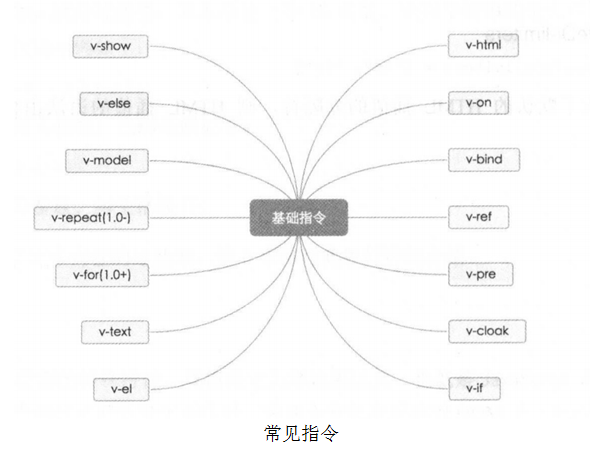
- Vue 的基础指令
- 常见问题
1. Vue 基础语法
1.1 插值表达式
数据绑定最常见的形式就是使用“Mustache”语法 (双大括号) 的文本插值
<!DOCTYPE html>
<html>
    <head>
        <meta charset="UTF-8">
        <title></title>
        <script src="https://cdn.jsdelivr.net/npm/vue/dist/vue.js"></script>
    </head>
    <body>
        <div id="app">
            {{message}}
        </div>
        <script>
            new Vue({
                el:"#app",
                data:{
                    message:"hesllo vue"
                }
            })
        </script>
    </body>
</html>
注意:{{}}里面接受的值如果加了""或者'',Vue会认为这是一个字符串,那么就会原样输出.
1.2 JavaScript表达式
{{}} 可以接受表达式形式的值,表达式是各种数值,变量,运算符的综合体.简单的表达式可以是常量或者变量名称,其次,还支持简单逻辑运算和算术运算,表达式的值是其运算结果。
{{number + 1}}
{{ ok ? 'YES' : 'NO' }}
这些表达式会在所属 Vue 实例的数据作用域下作为 JavaScript 被解析。有个限制就是,每个绑定都只能包含单个表达式,所以下面的例子都不会生效。
<!-- 这是语句,不是表达式 -->
{{ var a = 1 }}
<!-- 流控制也不会生效,请使用三元表达式 -->
{{ if (ok) { return message } }}
2. Vue 的基础指令
指令是带有 v- 前缀的特殊特性,其值限定为绑定表达式,也就是Javascript表达式。指令的作用是当表达式的值发生变化时,将这个变化也反映到DOM上。
2.1 v-if
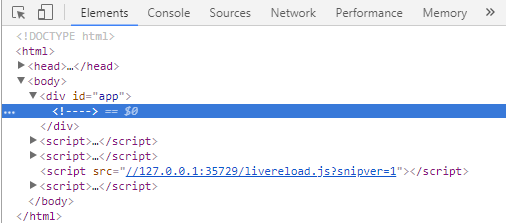
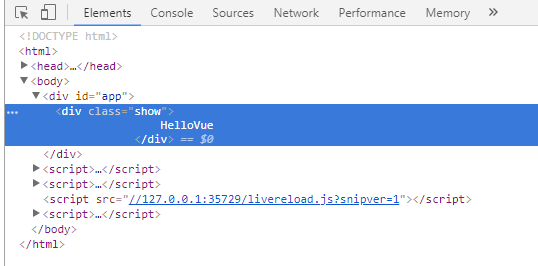
v-if 指令可以完全根据表达式的值在DOM中生成或移除一个元素。如果,v-if表达式赋值为false,那么对应的元素就会从DOM中移除,否则,对应元素的一个克隆将重新插入DOM中(项目中更加倾向)
- v-if 赋值为法 false 时浏览器的调试台的表现 :
<!DOCTYPE html>
<html>
    <head>
        <meta charset="UTF-8">
        <title></title>
        <script type="text/javascript" src="js/vue.js" ></script>
        <style>

        </style>
    </head>
    <body>
        <div id="app">
            <div class="show" v-if="isShow">
                {{message}}
            </div>

        </div>
        <script>
            new Vue({
                el:"#app",
                data:{
                    message:"HelloVue",
                    isShow:false
                }
            })
        </script>
    </body>
</html>
- v-if 赋值为法true时浏览器的调试台的表现
<!DOCTYPE html>
<html>
    <head>
        <meta charset="UTF-8">
        <title></title>
        <script type="text/javascript" src="js/vue.js" ></script>
        <style>

        </style>
    </head>
    <body>
        <div id="app">
            <div class="show" v-if="isShow">
                {{message}}
            </div>

        </div>
        <script>
            new Vue({
                el:"#app",
                data:{
                    message:"HelloVue",
                    isShow:true
                }
            })
        </script>
    </body>
</html>
2.2 v-show
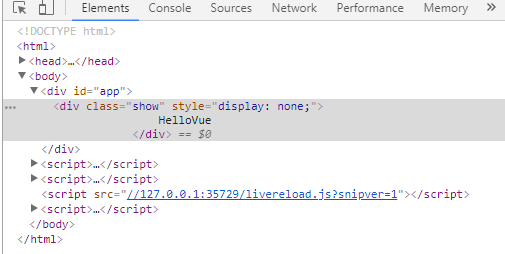
v-show指令时候根据表达式的值来显示或者隐藏HTML元素。当v-show赋值为false时,元素将被隐藏。查看DOM时,会发现元素上多了一个内联样式style="display:none"
<!DOCTYPE html>
<html>
    <head>
        <meta charset="UTF-8">
        <title></title>
        <script type="text/javascript" src="js/vue.js" ></script>
        <style>

        </style>
    </head>
    <body>
        <div id="app">
            <div class="show" v-show="isShow">
                {{message}}
            </div>

        </div>
        <script>
            new Vue({
                el:"#app",
                data:{
                    message:"HelloVue",
                    isShow:false
                }
            })
        </script>
    </body>
</html>
在切换v-if模块时,vue.js有一个局部编译/卸载的过程,因为v-if中的模板可能包括数据绑定或子组件。v-if是真实的条件渲染,因为它会确保条件块在切换时合适地销毁与重建条件块内的事件监听器和子组件。
v-if是惰性的—–如果初始渲染是条件为假,则什么都不做,在第一次为真时才开始局部编译(编译会缓存起来)。
相比之下,v-show简单得多——元素始终被编译并保留下来.只是简单的css切换。
一般来说,v-if有着更高的消耗,而v-show有更高的初始渲染消耗。因此,如果需要频繁的切换,则使用v-show。如果运行的条件不大可能改变,则使用v-if。
2.3 v-else
顾名思义,v-else就是JavaScript中else的意思,它必须跟着v-if,充当else功能。注意我们在使用v-else的时候,不可以v-if和v-else之间不可以有其它元素分隔。
<!DOCTYPE html>
<html>
    <head>
        <meta charset="UTF-8">
        <title></title>
        <script type="text/javascript" src="js/vue.js" ></script>
    </head>
    <body>
        <div id="app">
            <h1 v-if="isShow">v-if</h1>
            <h1 v-else="isShow">v-else</h1>
        </div>
        <script>
            new Vue({
                el:"#app",
                data:{
                    message:"HelloVue",
                    isShow:false
                }
            })
        </script>
    </body>
</html>
2.4 v-for
我们可以使用v-for指令基于源数据重复渲染元素。v-for指令需要使用 item in items 形式的特殊语法, items是源数据数组并且item是数组迭代的别名。有些时候我们需要获取元素的下标,则需写成 v-for = "(item,index) in items"
<!DOCTYPE html>
<html>
    <head>
        <meta charset="UTF-8">
        <title></title>
        <script type="text/javascript" src="js/vue.js" ></script>
    </head>
    <body>
        <div id="app">
            <ul>
                <li v-for="(item, index) in list">
                    {{item.title}}
                </li>
            </ul>
        </div>
        <script>
            new Vue({
                el:"#app",
                data:{
                    list:[
                        {title:"title1"},
                        {title:"title2"},
                        {title:"title3"}
                    ]
                }
            })
        </script>
    </body>
</html>
2.5 v-on
- v-on指令用于绑定事件监听器。事件参数是原生JS事件名称,例如:
- v-on:click //点击事件
- v-on:mouseover //移入事件
- 使用在普通元素上时,只能监听原生DOM事件;使用在自定义元素组件上时,也可以监听子组件触发的自定义事件。通常情况下我们会使用v-on的简写方式 @ 修饰符。
<!-- 完整语法 -->
<a v-on:click="doSomething">...</a>
<!-- 缩写 -->
<a @click="doSomething">...</a>
2.6 v-bind
在vue中v-bind主要用来绑定于元素的属性。其中,v-bind可以简写成:的形式。
练习1:图片的切换
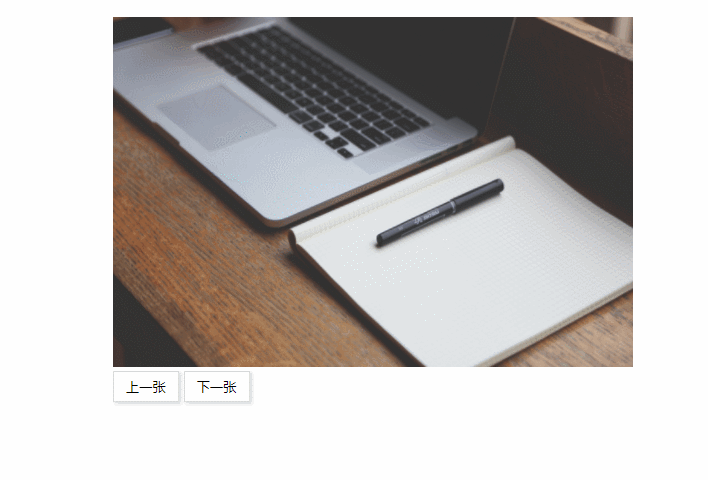
<!doctype html>
<html>

    <head>
        <meta charset="utf-8">
        <title>图片切换</title>
        <style type="text/css">
            *{
                margin: 0;
                padding: 0;
            }
            .content {
                width: 520px;
                height: 350px;
                margin: 20px auto;
            }
            .imgs img{
                width: 100%;
                height: 350px;
            }
            .btn button{
                padding: 6px 12px;
                border: 1px solid #ddd;
                box-shadow: 2px 2px 4px #ddd;
                background: #fff;
            }
        </style>
    </head>
    <body>
        <div id="app">
            <div class="content">
                <div class="imgs">
                    <img
                        v-for="(item,index) in imgs"
                        :key='index'
                        :src="item.img"
                        v-show = 'item.state'
                    >
                </div>
                <div class="btn">
                    <button class="prev" @click= "prev">上一张</button>
                    <button class="next" @click = "next">下一张</button>
                </div>
            </div>
        </div>
        <script src="http://www.tanshangbiao.cn/pack/vue/vue.js"></script>
        <script>
            new Vue({
                el:'#app',
                data:{
                    imgs:[
                        {img:'http://www.tanshangbiao.cn/wp-content/uploads/2018/09/Hippopx-2.jpg',state:true},
                        {img:'http://www.tanshangbiao.cn/wp-content/uploads/2018/07/weimei_de_pingguobijibendiannao-014.jpg',state:false},
                        {img:'http://www.tanshangbiao.cn/wp-content/uploads/2018/07/weimei_de_pingguobijibendiannao-002.jpg',state:false},
                        {img:'http://www.tanshangbiao.cn/wp-content/uploads/2018/07/Hippopx.jpg',state:false}
                    ],
                    num: 0
                },
                methods:{
                    prev(){
                        this.num--
                        if(this.num<0){
                            this.num = this.imgs.length-1
                        }
                        for(var i=0;i<this.imgs.length;i++){
                            this.imgs[i].state = false
                        }
                        this.imgs[this.num].state = true

                    },
                    next(){
                        this.num++
                        if(this.num>this.imgs.length-1){
                            this.num = 0
                        }
                        for(var i=0;i<this.imgs.length;i++){
                            this.imgs[i].state = false
                        }
                        this.imgs[this.num].state = true
                    }
                }
            })
        </script>
    </body>
</html>
练习2:选项卡切换
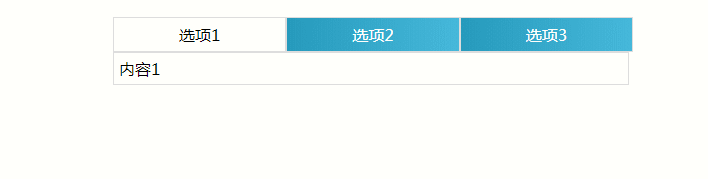
<!doctype html>
<html>

    <head>
        <meta charset="utf-8">
        <title>vue选项卡</title>
        <style scoped="scoped">
            *{
                margin: 0;
                padding: 0;
            }
            ul li{
                list-style: none;
                cursor: pointer;
            }
            .tabs{
                width: 520px;
                margin: 20px auto;
            }
            .tabs .nav{
                display: flex;
            }
            .nav li{
                flex: 1;
                box-sizing: border-box;
                padding: 6px 12px;
                text-align: center;
                border: 1px solid #ddd;
                background: -webkit-linear-gradient(left,#269ABC,#46B8DA);
                color: #fff;
            }
            .nav li.active{
                background: #fff;
                color: #000;
            }
            .tabs .contents{
                width: 96.9%;
                padding: 5px;
                border: 1px solid #ddd;
            }
        </style>
    </head>
    <body>
        <div id="app">
            <div class="tabs">
                <ul class="nav">
                    <li
                        v-for="(item,index) in navs"
                        :key="index"
                        @click = "tab(index)"
                        v-bind:class="{active:index==current}"
                    >
                        {{item.title}}
                    </li>
                </ul>
                <div class="contents">
                    {{message}}
                </div>
            </div>
        </div>
        <script src="http://www.tanshangbiao.cn/pack/vue/vue.js"></script>
        <script>
            //实例化
            new Vue({
                el:"#app",
                data:{
                    message:'内容1',
                    current:0,
                    navs:[
                        {title:'选项1'},
                        {title:'选项2'},
                        {title:'选项3'}
                    ],
                    content:[
                        {contents:'内容1'},
                        {contents:'内容2'},
                        {contents:'内容3'}
                    ]
                },
                methods:{
                    tab(index){
                        console.log(index)
                        this.message = this.content[index].contents
                        this.current = index
                    }
                }
            })
        </script>
    </body>
</html>
2.7 v-model
这里用一道练习来体验一下 v-model
练习1:商品购物车
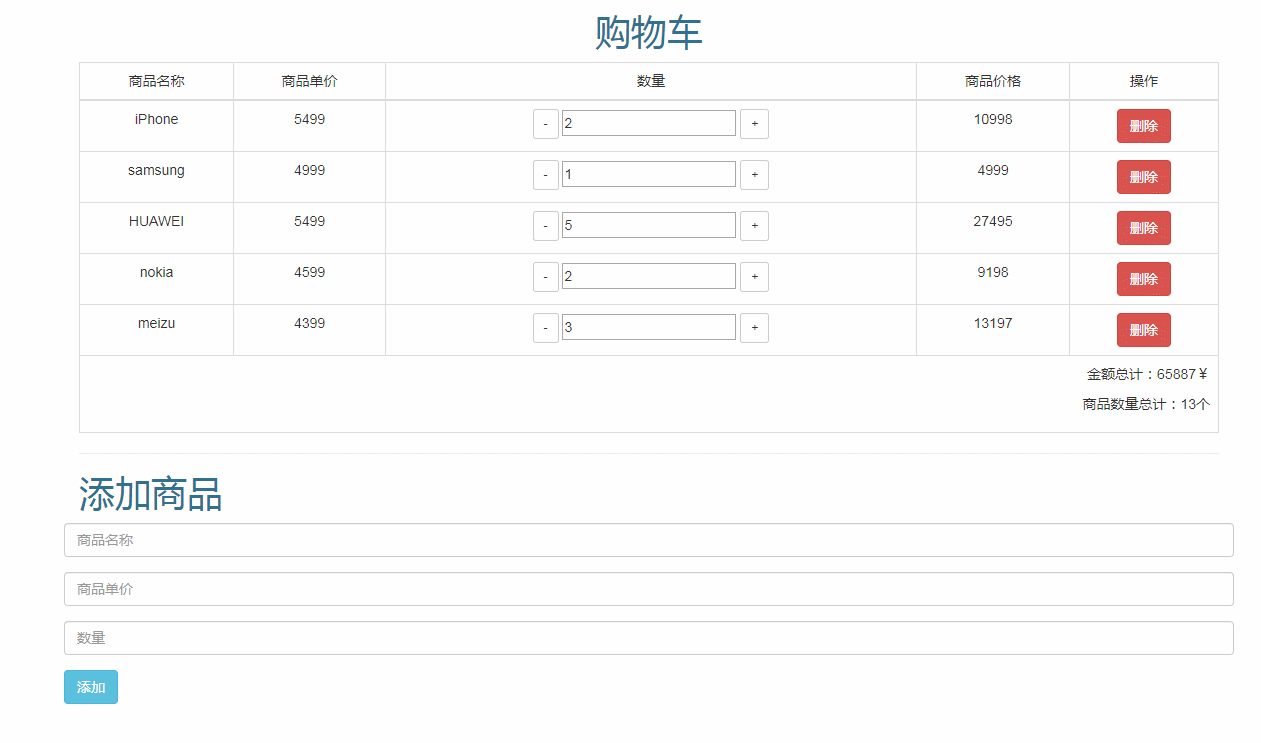
<!DOCTYPE html>
<html>
    <head>
        <meta charset="UTF-8">
        <title>商品购物车</title>
        <link rel="stylesheet" href=""http://www.tanshangbiao.cn/pack/bootstrap/bootstrap.css" />
        <script src="http://www.tanshangbiao.cn/pack/vue/vue.js"></script>
    </head>
    <body>
        <div id="app">
            <div class="container">
                <table class="table table-bordered table-hover">
                    <tr>
                        <td>
                            <input type="checkbox" v-model="checkAll" @click="selectAll"/>
                        </td>
                        <td>
                            商品名称
                        </td>
                        <td>
                            商品价格
                        </td>
                        <td>
                            商品数量
                        </td>
                        <td>
                            商品总额
                        </td>
                        <td>
                            操作
                        </td>
                    </tr>
                    <tr v-for="(item,index) in listInfo">

                        <td>
                            <input
                                type="checkbox"
                                :value="item.id"
                                v-model="checkItem"
                                @change="selectOne(index)"
                            >
                        </td>
                        <td>{{item.shopName}}</td>
                        <td>{{item.shopPrice}}</td>
                        <td>
                            <button class="btn btn-default" @click="reduce(index)">-</button>
                            <input type="text" v-model="item.shopCount" />
                            <button class="btn btn-default" @click="add(index)">+</button>
                        </td>
                        <td>
                            {{item.shopPrice*item.shopCount}}
                        </td>
                        <td>
                            <button class="btn btn-danger" @click="del(index)">删除</button>
                        </td>
                    </tr>

                </table>
                <p class="text-right">
                    金额总计:{{sum}}
                </p>
                <p class="text-right">
                    商品数量:{{count}}
                </p>
                <hr />
                <form>
                    <div class="form-group">
                        <input class="form-control" placeholder="商品名称" v-model="shopName" />
                    </div>
                    <div class="form-group">
                        <input class="form-control" placeholder="商品价格" v-model = "shopPrice"/>
                    </div>
                    <div class="form-group">
                        <button class="btn btn-primary" type="button" @click="addInfo">增加</button>
                    </div>
                </form>
            </div>
        </div>
        <script>
            new Vue({
                el:"#app",
                data:{
                    listInfo:[
                        {id:1,shopName:"男装1",shopPrice:1000,shopCount:1,isBuy:false},
                        {id:2,shopName:"男装2",shopPrice:2000,shopCount:2,isBuy:false},
                        {id:3,shopName:"男装3",shopPrice:3000,shopCount:3,isBuy:false},
                        {id:4,shopName:"男装4",shopPrice:4000,shopCount:4,isBuy:false},
                        {id:5,shopName:"男装5",shopPrice:5000,shopCount:5,isBuy:false},
                    ],
                    shopName:"",
                    shopPrice:"",
                    checkItem:[],
                    checkAll:false
                },
                methods:{
                    add:function(index){
                        this.listInfo[index].shopCount++

                    },
                    reduce:function(index){
                        if(this.listInfo[index].shopCount<=0){
                            this.listInfo[index].shopCount = 0
                        }else {
                            this.listInfo[index].shopCount--
                        }

                    },
                    addInfo:function(){
                        var obj = {
                            id:this.listInfo.length+1,
                            shopName:this.shopName,
                            shopPrice:this.shopPrice,
                            shopCount:0,
                            isBuy:false
                        }
                        console.log(obj)
                        this.listInfo.push(obj)

                    },
                    del(index){
                        if(confirm("确定完成了吗?")){
                            this.listInfo.splice(index,1)
                        }
                    },
                    selectOne(index){
                        if(this.checkItem.length == this.listInfo.length){
                            this.checkAll = true
                        }else {
                            this.checkAll = false
                        }
                        if(this.listInfo[index].isBuy){
                            this.listInfo[index].isBuy = false
                        }else{
                            this.listInfo[index].isBuy = true
                        }
                    },
                    selectAll(){
                        this.checkItem = []
                        if(!this.checkAll){
                            for (var i=0;i<this.listInfo.length;i++) {
                                this.checkItem.push(this.listInfo[i].id)
                                this.listInfo[i].isBuy = true
                            }
                        }else {
                            this.checkItem = []
                            this.checkAll = false
                            for (var i=0;i<this.listInfo.length;i++) {
                                this.listInfo[i].isBuy = false
                            }
                        }

                    }
                },
                computed:{
                    sum(){
                        var total = 0
                        for (var i=0;i<this.listInfo.length;i++) {
                            if(this.listInfo[i].isBuy){
                                total+=parseFloat(this.listInfo[i].shopPrice)*parseFloat(this.listInfo[i].shopCount)
                            }
                        }
                        return total
                    },
                    count:function(){
                        var total = 0
                        for (var i=0;i<this.listInfo.length;i++) {
                            if(this.listInfo[i].isBuy){
                                total+=parseInt(this.listInfo[i].shopCount)
                            }
                        }
                        return total
                    }
                }
            })
        </script>
    </body>
</html>
3. 常见问题
3.1 v-on可以绑定多个方法吗?
v-on可以绑定多种类型的方法,可以是click事件,可以是focus事件,也可以是change事件,根据业务需求进行选择。但是,如果v-on绑定了两个甚至多个click事件,那么v-on只会绑定第一个click事件,其他会自动忽略。
3.2 一个vue实例可以绑定多个element元素吗?
el为实例提供挂载元素,值可以是css选择器,也可以是id选择器,也可以是实际的HTML。但不可以同时多个出现。